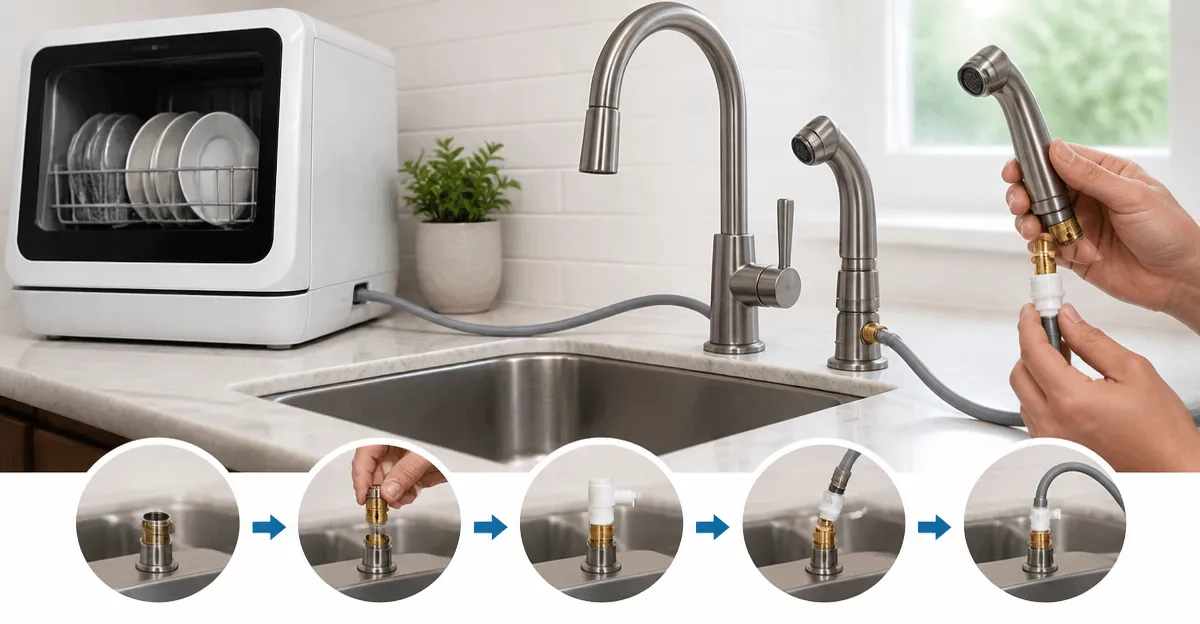
How to Connect a Countertop Dishwasher to a Kitchen Side Sprayer: Step‑by‑Step DIY Installation Guide
Introduction
One often encounters the need to supply water to a portable or countertop dishwasher when a dedicated inlet is unavailable. This guide explains how to use a kitchen side sprayer as a water source, ensuring a secure, leak‑free connection. The reader will learn the necessary tools, the precise sequence of actions, and how to avoid common pitfalls. Mastering this process expands the flexibility of kitchen layouts and reduces reliance on permanent plumbing modifications.
What You'll Need
- Shark Industrial Dishwasher Elbow Fitting – $5.95, 4.7/5 rating
- Dreyoo Dishwasher Drain Hose Adapter – $6.95, 4.5/5 rating
- Hibbent Faucet to Dishwasher Adapter – $9.99, 4.4/5 rating
- happywins Dishwasher Faucet Adapter – $8.99, 4.5/5 rating
- KCMOSGI Dishwasher Drain Hose Adapter – $8.99, 4.4/5 rating
- Adjustable wrench, screwdriver set, Teflon tape, bucket for water catch
Step 1: Shut Off the Water Supply
One should begin by turning off the water valve that feeds the kitchen side sprayer. This action prevents accidental flooding while the faucet is being modified. Open the sprayer briefly to relieve any residual pressure in the line. Verify that the flow has stopped before proceeding to the next step.
Step 2: Remove the Existing Aerator
The side sprayer typically terminates with a small aerator that regulates water flow. Use an adjustable wrench to unscrew the aerator in a counter‑clockwise direction. Keep the aerator aside in case it is needed later. This removal creates a clean threaded opening for the adapter.
Step 3: Install a Faucet Adapter
At this stage one must attach a faucet‑to‑dishwasher adapter to the exposed threads. Both the Hibbent Faucet to Dishwasher Adapter and the happywins Dishwasher Faucet Adapter are suitable, but the Hibbent model offers a built‑in aerator function that conserves water when the dishwasher is not in use. The adapter features a 15/16‑inch male thread that matches the faucet and a 55/64‑inch female thread for the dishwasher hose. Apply a thin layer of Teflon tape to the male threads, then hand‑tighten the adapter followed by a quarter turn with the wrench. The swivel ball joint on the Hibbent adapter allows 360‑degree rotation, simplifying hose positioning.
Step 4: Prepare the Dishwasher Drain Hose
The countertop dishwasher will have a flexible drain hose that must be linked to the faucet adapter. The Dreyoo Dishwasher Drain Hose Adapter provides a universal tapered fit, accommodating hose diameters from 0.5 to 1.2 inches. Cut the hose to a length that leaves a gentle slope toward the sink, avoiding tension that could cause kinks. Insert the cut end into the adapter’s inlet, then secure it with the included hose clamp. This adapter’s rubber construction ensures a leak‑free seal and its three‑diameter design eliminates the need for additional fittings.
Step 5: Connect the Elbow Fitting (Optional for Complex Angles)
If the hose must change direction sharply, the Shark Industrial Dishwasher Elbow Fitting is an ideal solution. The fitting converts a 3/8‑inch compression connection on the dishwasher hose to a 3/4‑inch female garden hose thread, matching many sprayer outlets. Its lead‑free brass construction provides burst‑proof durability, and the included rubber washer prevents leaks. Attach the elbow to the hose compression end, then thread the opposite side into the faucet adapter if the adapter’s threads accept a garden‑hose size, or use a compatible coupling.
Step 6: Secure All Connections with Clamps and Washers
Each connection point should be reinforced with the appropriate clamp or washer. The Dreyoo kit supplies one inlet connector, one hose clamp, and three spring clamps; use the spring clamps on the adapter’s swivel joint to prevent rotation under pressure. The happywins adapter includes a thick and a thin washer; place the thin washer at the faucet side and the thick washer at the dishwasher side before tightening. Properly tightened clamps eliminate the risk of water seepage during operation.
Step 7: Turn On the Water and Check for Leaks
After all fittings are tightened, slowly reopen the water valve. Observe each joint for drips, paying special attention to the swivel joint and the hose‑to‑adapter interface. If a leak is detected, tighten the connection a half‑turn and re‑apply Teflon tape if necessary. The burst‑proof brass of the Shark elbow and the rubber seal of the Dreyoo adapter typically prevent recurring leaks.
Step 8: Run a Test Cycle on the Dishwasher
Place a bucket beneath the hose outlet to catch any unexpected discharge, then start a short wash cycle on the countertop dishwasher. Monitor the water flow through the side sprayer and the hose connection throughout the cycle. A successful test will show steady water delivery without splashing or pressure loss. If water pressure appears low, adjust the swivel joint on the Hibbent adapter to a more favorable angle.
Step 9: Finalize the Installation
Once the test cycle confirms a secure, leak‑free connection, tighten all fasteners to their final torque specifications. Replace any decorative caps on the faucet if desired. Store the bucket and any excess hose length in a convenient location for future maintenance. The installation is now complete and the countertop dishwasher can be used regularly.
Tips & Pro Tips
- Always use Teflon tape on threaded connections to improve seal integrity.
- When cutting the dishwasher hose, leave an extra 2‑inch length to allow for minor adjustments.
- The swivel ball joint on the Hibbent adapter reduces stress on the hose during daily use.
- If the kitchen side sprayer has a low flow rate, consider installing a low‑restriction aerator such as the one built into the Hibbent adapter.
- Periodically inspect the rubber washers for wear and replace them to maintain a leak‑proof system.
Troubleshooting
Problem: Water drips from the adapter after the dishwasher cycle ends.
Solution: Shut off the water supply, remove the adapter, and re‑apply Teflon tape to the threads. Ensure the rubber washer is seated correctly and that the clamp is fully engaged.
Problem: Insufficient water pressure reaches the dishwasher.
Solution: Verify that the side sprayer valve is fully open. Adjust the swivel joint on the Hibbent adapter to a straighter alignment, or replace the hose with a larger‑diameter segment from the Dreyoo kit.
Conclusion
This guide has demonstrated how to connect a countertop dishwasher to a kitchen side sprayer using reliable adapters and fittings. By following the numbered steps, the reader can achieve a professional‑grade installation without the need for a licensed plumber. The recommended products provide durability, leak protection, and ease of use, ensuring long‑term satisfaction. One is encouraged to apply these techniques to future portable appliance installations, thereby enhancing kitchen versatility.
Products Mentioned in This Guide
Frequently Asked Questions
Can I use a kitchen side sprayer as the water source for a countertop dishwasher?
Yes, a side sprayer can supply water to a countertop dishwasher using the proper faucet-to-dishwasher adapter and hose fittings.
What tools and adapters are required for the installation?
You’ll need a faucet-to-dishwasher adapter, a dishwasher elbow fitting, a drain hose adapter, a wrench, and Teflon tape for sealing connections.
How do I prevent leaks when connecting the dishwasher to the sprayer?
Wrap Teflon tape on all threaded connections, tighten fittings securely with a wrench, and test for drips before running a full cycle.
Is a permanent plumbing modification necessary for this setup?
No, the connection is temporary and reversible, making it ideal for renters or kitchens without dedicated dishwasher lines.
Can I disconnect the dishwasher later without damaging the faucet?
Yes, simply unscrew the adapter and fittings; the faucet threads remain intact when you use the correct tools and avoid overtightening.