Introduction
This guide explains how to install a portable dishwasher without a faucet adapter, allowing users to avoid permanent plumbing modifications. Readers will learn how to position the unit, connect water, manage drainage, and operate the appliance safely. The method is suitable for renters, small‑space dwellers, and anyone who values flexibility in the kitchen. By following the steps, one can achieve a fully functional dishwasher setup using only basic tools and optional recommended products.
What You'll Need
- Portable countertop dishwasher (examples: COMFEE' Portable Countertop Dishwasher, EUHOMY Portable Countertop Dishwasher)
- Water pitcher or large measuring jug (often included with the dishwasher)
- Flexible drain hose (usually supplied)
- Bucket or large basin for drainage
- Leveling mat or non‑slip pad
- Adjustable wrench (optional for hose connections)
1. Prepare the Workspace
The first step is to select a stable countertop area that provides at least 19.6 inches of vertical clearance to the upper cabinets. Measure the width and depth of the dishwasher to ensure it fits comfortably without obstructing other appliances. Place a non‑slip mat beneath the unit to prevent movement during operation, which also protects the countertop from moisture. Finally, verify that an electrical outlet is within reach of the power cord, and that the outlet is grounded.
2. Position the Dishwasher and Fill the Water Tank
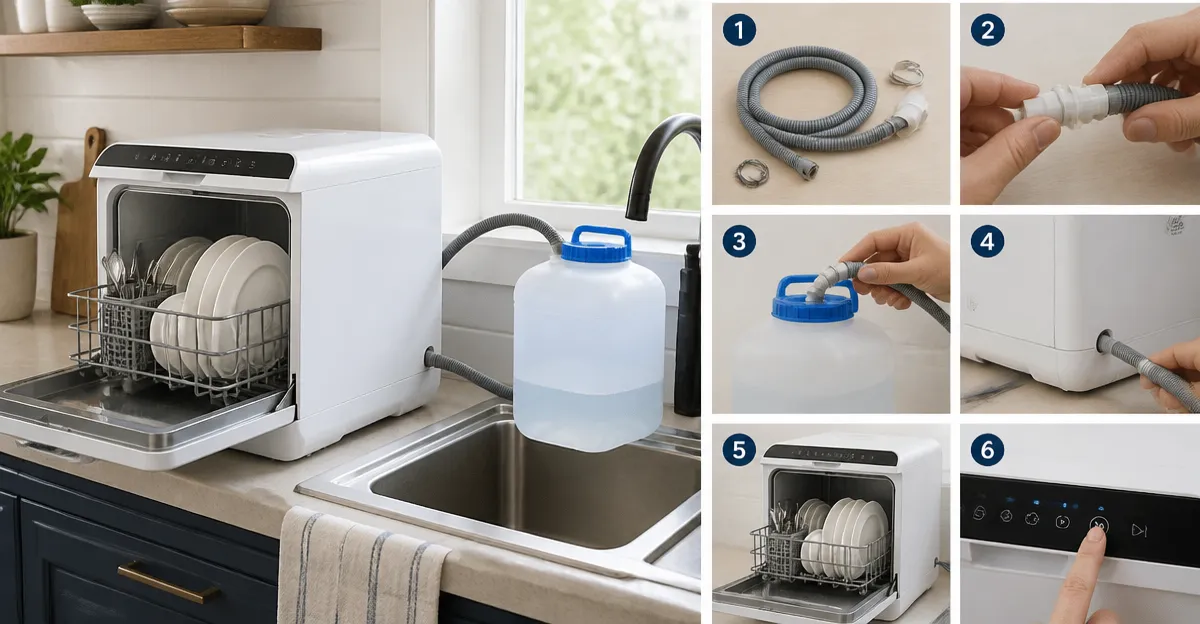
Most countertop models feature a built‑in water tank; the COMFEE' Portable Countertop Dishwasher includes a 1.32‑gallon tank and a clear filling guide. Remove the tank lid, place the supplied pitcher under the fill spout, and pour water until the indicator beeps, indicating the correct level. The tank capacity is sufficient for a typical daily load of 30+ items, and the manual filling process eliminates the need for a faucet connection. Ensure the tank is securely closed to avoid leaks during the wash cycle.
3. Connect the Drain Hose
Attach the flexible drain hose to the dishwasher's outlet; most units use a quick‑connect fitting that does not require tools. Direct the free end of the hose into a bucket, sink, or a large basin placed on the floor. The EUHOMY Portable Countertop Dishwasher offers a detachable hose that can be positioned lower than the unit to promote gravity‑assisted drainage, reducing the risk of backflow. Verify that the hose is not kinked, as a restriction can cause error codes or incomplete draining.
4. Secure the Power Supply
Plug the dishwasher into a dedicated 120‑V outlet; avoid using extension cords unless they are rated for the appliance's current draw. Many countertop dishwashers, including the EUHOMY Portable Countertop Dishwasher, consume approximately 1200 W during the heating phase, which is comparable to a small microwave. Turn on the unit and confirm that the control panel lights illuminate, indicating that the appliance receives power correctly.
5. Select the Appropriate Wash Program
Review the dishwasher's program menu; the COMFEE' model provides six cycles, including Normal, Rapid, Hygiene, Fruit, Glass, and Air Refresh. For heavily soiled dishes, the Hygiene cycle raises water temperature to 162 °F, delivering a sanitizing effect similar to a commercial dishwasher. If time is limited, the Rapid program completes a wash in approximately 40 minutes while using half the recommended detergent amount. Choose a program that matches the load type and desired drying level.
6. Load the Dishwasher Efficiently
Arrange plates, bowls, and glasses at an angle to allow water to reach every surface; the dual‑spray arms of the AIRMSEN Portable Countertop Dishwasher provide 360° coverage from both the upper and lower arms. Place larger items on the lower rack and smaller pieces on the upper rack, ensuring that no item blocks the spray path. Use the cutlery basket for forks, knives, and spoons, but avoid over‑crowding, which can impede water flow. Pre‑rinsing is not required for most cycles, yet removing large food particles improves cleaning efficiency.
7. Start the Cycle and Monitor Progress
Press the Start button; the unit will emit a beep when the water tank reaches the required level. During the wash, the transparent door allows visual confirmation of water flow and foam formation. If the dishwasher includes an Air Refresh or drying mode, the door can be opened slightly after the cycle to enhance air circulation and prevent moisture buildup. Observe the display for any error codes; a common code indicates over‑filling, which can be resolved by draining excess water as described in the troubleshooting section.
8. Unload and Store the Dishwasher
When the cycle completes, open the door and allow dishes to air‑dry for a few minutes before removing them, especially if the Air Refresh mode was not used. Empty the water tank if any residual water remains, and wipe the interior with a soft cloth to prevent mineral deposits. Store the drain hose in a coil beside the unit to keep the countertop tidy. Regularly clean the filter, which is located at the bottom of the dishwasher, to maintain optimal performance.
Tips & Pro Tips
- Place the dishwasher near a window or well‑ventilated area to help the drying process.
- Use dishwasher‑specific powder or tablet detergents; liquid dish soap can create excessive suds and trigger error codes.
- For households with children, the Hygiene or Baby Care cycles provide temperatures above 160 °F, ensuring thorough sanitization.
- Schedule a weekly quick‑clean cycle without dishes to keep the interior free of limescale and odors.
Troubleshooting
Problem: Unit does not start after filling the tank.
Solution: Verify that the water level indicator has turned green; if not, add water until the beep sounds. Check that the power switch is on and that the outlet is functioning.
Problem: Error code appears indicating “over‑fill.”
Solution: Turn the unit upside down with the door open for five minutes to drain excess water, then reset the machine by powering it off for one minute.
Problem: Dishes retain spots after the cycle.
Solution: Reduce detergent quantity, ensure the filter is clean, and run the Hygiene or Glass program for higher temperature cleaning.
Conclusion
This guide has demonstrated a practical, plumbing‑free method to install a portable dishwasher using only a water tank, a drain hose, and basic household tools. By following the eight numbered steps, users can achieve reliable cleaning performance without permanent modifications to the kitchen. The recommended products provide built‑in tanks, quiet operation, and versatile programs that suit a variety of living situations. Implementing the tips and troubleshooting advice will further extend the lifespan of the appliance and enhance user satisfaction.
Products Mentioned in This Guide
Frequently Asked Questions
Can I install a portable dishwasher without a faucet adapter?
Yes, you can use a water pitcher or jug to manually fill the dishwasher and a bucket for drainage, avoiding permanent plumbing.
What basic tools are required for a no‑adapter installation?
Only a leveling mat or non‑slip pad, a flexible drain hose, and optionally an adjustable wrench for hose connections.
How do I manage the dishwasher’s drainage without a sink hook‑up?
Place a bucket or large basin under the drain hose and periodically empty it as the cycle finishes.
Is this method suitable for renters?
Absolutely; it requires no modifications to the kitchen plumbing and can be removed easily when you move out.
How often should I level the portable dishwasher?
Check the level each time you move the unit, adjusting the mat or pads to keep it stable and prevent vibrations.